文章目录
  1. 1. 多级依赖注入
    1. 1.1. 模块注入器
      1. 1.1.1. 平台模块(PlatformModule)注入器
      2. 1.1.2. 应用程序根模块(AppModule)注入器
      3. 1.1.3. 模块注入器层级
    2. 1.2. 元素注入器
      1. 1.2.1. 元素注入器的引入
      2. 1.2.2. 元素注入器(Element Injector)
      3. 1.2.3. 元素注入器与模块注入器的设计
    3. 1.3. Angular 解析依赖过程
      1. 1.3.1. 合并注入器(Merge Injector)
      2. 1.3.2. 解析过程
    4. 1.4. 总结
      1. 1.4.1. 参考

作为“为大型前端项目”而设计的前端框架,Angular 其实有许多值得参考和学习的设计,本系列主要用于研究这些设计和功能的实现原理。本文主要围绕 Angular 中的最大特点——依赖注入,介绍 Angular 中多级依赖注入的设计。

上一篇我们介绍了 Angular 中的Injectot注入器、Provider提供者,以及注入器机制。那么,在 Angular 应用中,各个组件和模块间又是怎样共享依赖的,同样的服务是否可以多次实例化呢?

组件和模块的依赖注入过程,离不开 Angular 多级依赖注入的设计,我们来看看。

多级依赖注入

前面我们说过,Angular 中的注入器是可继承、且分层的。

在 Angular 中,有两个注入器层次结构:

  • ModuleInjector模块注入器:使用@NgModule()@Injectable()注解在此层次结构中配置ModuleInjector
  • ElementInjector元素注入器:在每个 DOM 元素上隐式创建

模块注入器和元素注入器都是树状结构的,但它们的分层结构并不完全一致。
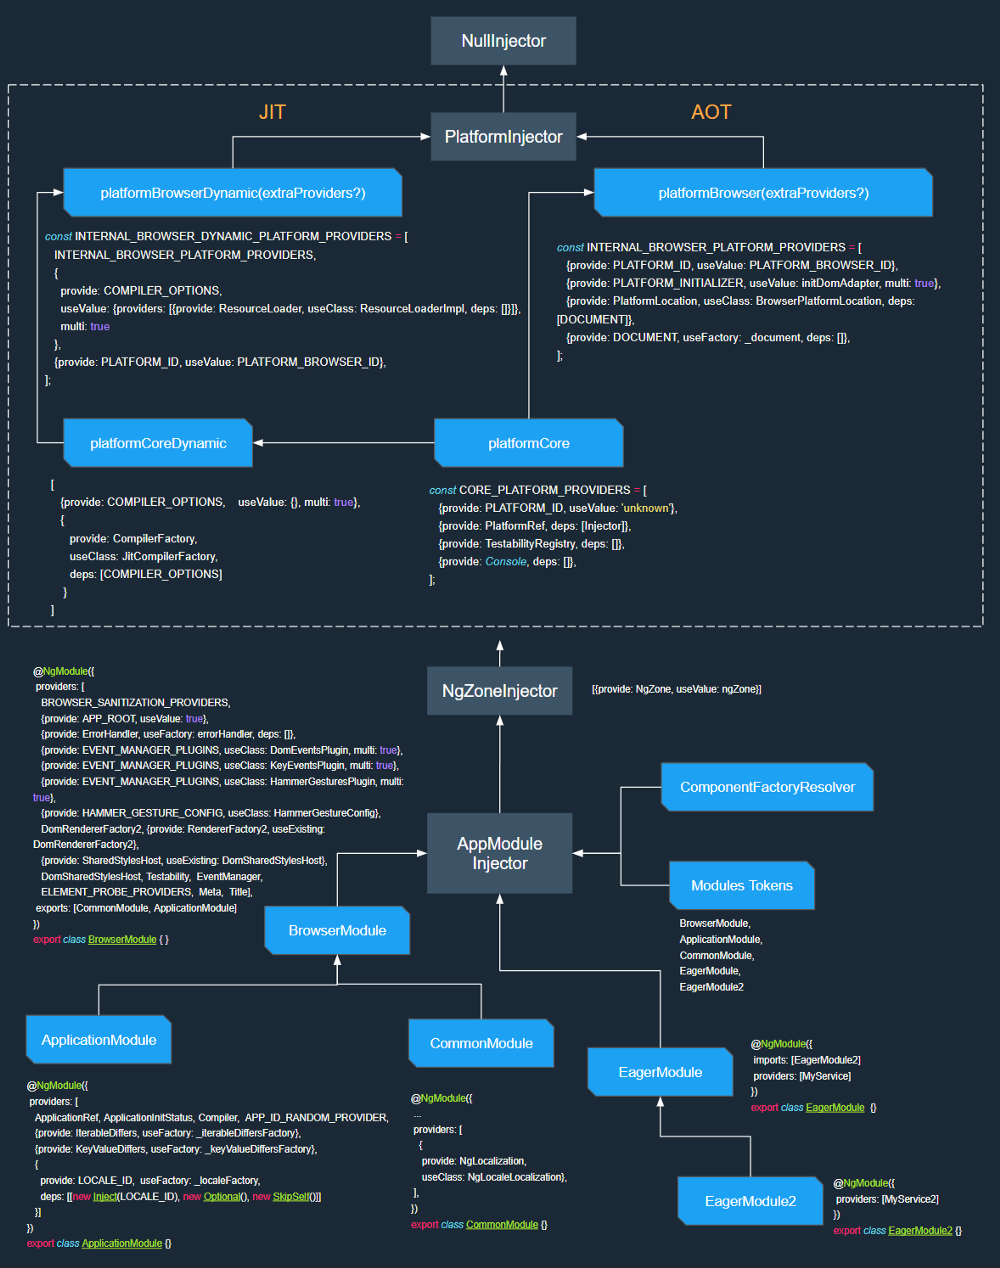
模块注入器

模块注入器的分层结构,除了与应用中模块设计有关系,还有平台模块(PlatformModule)注入器与应用程序模块(AppModule)注入器的分层结构。

平台模块(PlatformModule)注入器

在 Angular 术语中,平台是供 Angular 应用程序在其中运行的上下文。Angular 应用程序最常见的平台是 Web 浏览器,但它也可以是移动设备的操作系统或 Web 服务器。

Angular 应用在启动时,会创建一个平台层:

  • 平台是 Angular 在网页上的入口点,每个页面只有一个平台
  • 页面上运行的每个 Angular 应用程序,所共有的服务都在平台内绑定

一个 Angular 平台,主要包括创建模块实例、销毁等功能:

1
2
3
4
5
6
7
8
9
10
11
12
13
14
15
16
17
18
19
20
21
22
23
24
25
@Injectable()
export class PlatformRef {
// 传入注入器,作为平台注入器
constructor(private _injector: Injector) {}

// 为给定的平台创建一个 @NgModule 的实例,以进行离线编译
bootstrapModuleFactory<M>(moduleFactory: NgModuleFactory<M>, options?: BootstrapOptions):
Promise<NgModuleRef<M>> {}

// 使用给定的运行时编译器,为给定的平台创建一个 @NgModule 的实例
bootstrapModule<M>(
moduleType: Type<M>,
compilerOptions: (CompilerOptions&BootstrapOptions)|
Array<CompilerOptions&BootstrapOptions> = []): Promise<NgModuleRef<M>> {}

// 注册销毁平台时要调用的侦听器
onDestroy(callback: () => void): void {}

// 获取平台注入器
// 该平台注入器是页面上每个 Angular 应用程序的父注入器,并提供单例提供程序
get injector(): Injector {}

// 销毁页面上的当前 Angular 平台和所有 Angular 应用程序,包括销毁在平台上注册的所有模块和侦听器
destroy() {}
}

实际上,平台在启动的时候(bootstrapModuleFactory方法中),在ngZone.run中创建ngZoneInjector,以便在 Angular 区域中创建所有实例化的服务,而ApplicationRef(页面上运行的 Angular 应用程序)将在 Angular 区域之外创建。

在浏览器中启动时,会创建浏览器平台:

1
2
3
4
5
export const platformBrowser: (extraProviders?: StaticProvider[]) => PlatformRef =
createPlatformFactory(platformCore, 'browser', INTERNAL_BROWSER_PLATFORM_PROVIDERS);

// 其中,platformCore 平台必须包含在任何其他平台中
export const platformCore = createPlatformFactory(null, 'core', _CORE_PLATFORM_PROVIDERS);

使用平台工厂(例如上面的createPlatformFactory)创建平台时,将隐式初始化页面的平台:

1
2
3
4
5
6
7
8
9
10
11
12
13
14
15
16
17
18
19
20
21
22
23
24
25
26
export function createPlatformFactory(
parentPlatformFactory: ((extraProviders?: StaticProvider[]) => PlatformRef)|null, name: string,
providers: StaticProvider[] = []): (extraProviders?: StaticProvider[]) => PlatformRef {
const desc = `Platform: ${name}`;
const marker = new InjectionToken(desc); // DI 令牌
return (extraProviders: StaticProvider[] = []) => {
let platform = getPlatform();
// 若平台已创建,则不做处理
if (!platform || platform.injector.get(ALLOW_MULTIPLE_PLATFORMS, false)) {
if (parentPlatformFactory) {
// 若有父级平台,则直接使用父级平台,并更新相应的提供者
parentPlatformFactory(
providers.concat(extraProviders).concat({provide: marker, useValue: true}));
} else {
const injectedProviders: StaticProvider[] =
providers.concat(extraProviders).concat({provide: marker, useValue: true}, {
provide: INJECTOR_SCOPE,
useValue: 'platform'
});
// 若无父级平台,则新建注入器,并创建平台
createPlatform(Injector.create({providers: injectedProviders, name: desc}));
}
}
return assertPlatform(marker);
};
}

通过以上过程,我们知道 Angular 应用在创建平台的时候,创建平台的模块注入器ModuleInjector。我们从上一节Injector定义中也能看到,NullInjector是所有注入器的顶部:

1
2
3
export abstract class Injector {
static NULL: Injector = new NullInjector();
}

因此,在平台模块注入器之上,还有NullInjector()。而在平台模块注入器之下,则还有应用程序模块注入器。

应用程序根模块(AppModule)注入器

每个应用程序有至少一个 Angular 模块,根模块就是用来启动此应用的模块:

1
2
3
4
5
@NgModule({ providers: APPLICATION_MODULE_PROVIDERS })
export class ApplicationModule {
// ApplicationRef 需要引导程序提供组件
constructor(appRef: ApplicationRef) {}
}

AppModule根应用模块由BrowserModule重新导出,当我们使用 CLI 的new命令创建新应用时,它会自动包含在根AppModule中。应用程序根模块中,提供者关联着内置的 DI 令牌,用于为引导程序配置根注入器。

Angular 还将ComponentFactoryResolver添加到根模块注入器中。此解析器存储了entryComponents系列工厂,因此它负责动态创建组件。

模块注入器层级

到这里,我们可以简单地梳理出模块注入器的层级关系:

  1. 模块注入器树的最上层则是应用程序根模块(AppModule)注入器,称作 root。
  2. 在 root 之上还有两个注入器,一个是平台模块(PlatformModule)注入器,一个是NullInjector()

因此,模块注入器的分层结构如下:

在我们实际的应用中,它很可能是这样的:

Angular DI 具有分层注入体系,这意味着下级注入器也可以创建它们自己的服务实例。

元素注入器

前面说过,在 Angular 中有两个注入器层次结构,分别是模块注入器和元素注入器。

元素注入器的引入

当 Angular 中懒加载的模块开始广泛使用时,出现了一个 issue:依赖注入系统导致懒加载模块的实例化加倍。

在这一次修复中,引入了新的设计注入器使用两棵并行的树,一棵用于元素,另一棵用于模块

Angular 会为所有entryComponents创建宿主工厂,它们是所有其他组件的根视图。

这意味着每次我们创建动态 Angular 组件时,都会使用根数据(RootData)创建根视图(RootView):

1
2
3
4
5
6
7
8
9
10
11
12
13
14
15
16
17
18
19
20
21
class ComponentFactory_ extends ComponentFactory<any>{
create(
injector: Injector, projectableNodes?: any[][], rootSelectorOrNode?: string|any,
ngModule?: NgModuleRef<any>): ComponentRef<any> {
if (!ngModule) {
throw new Error('ngModule should be provided');
}
const viewDef = resolveDefinition(this.viewDefFactory);
const componentNodeIndex = viewDef.nodes[0].element!.componentProvider!.nodeIndex;
// 使用根数据创建根视图
const view = Services.createRootView(
injector, projectableNodes || [], rootSelectorOrNode, viewDef, ngModule, EMPTY_CONTEXT);
// view.nodes 的访问器
const component = asProviderData(view, componentNodeIndex).instance;
if (rootSelectorOrNode) {
view.renderer.setAttribute(asElementData(view, 0).renderElement, 'ng-version', VERSION.full);
}
// 创建组件
return new ComponentRef_(view, new ViewRef_(view), component);
}
}

该根数据(RootData)包含对elInjectorngModule注入器的引用:

1
2
3
4
5
6
7
8
9
10
11
12
13
14
15
16
17
function createRootData(
elInjector: Injector, ngModule: NgModuleRef<any>, rendererFactory: RendererFactory2,
projectableNodes: any[][], rootSelectorOrNode: any): RootData {
const sanitizer = ngModule.injector.get(Sanitizer);
const errorHandler = ngModule.injector.get(ErrorHandler);
const renderer = rendererFactory.createRenderer(null, null);
return {
ngModule,
injector: elInjector,
projectableNodes,
selectorOrNode: rootSelectorOrNode,
sanitizer,
rendererFactory,
renderer,
errorHandler,
};
}

引入元素注入器树,原因是这样的设计比较简单。通过更改注入器层次结构,避免交错插入模块和组件注入器,从而导致延迟加载模块的双倍实例化。因为每个注入器都只有一个父对象,并且每次解析都必须精确地寻找一个注入器来检索依赖项。

元素注入器(Element Injector)

在 Angular 中,视图是模板的表示形式,它包含不同类型的节点,其中便有元素节点,元素注入器位于此节点上:

1
2
3
4
5
6
7
export interface ElementDef {
...
// 在该视图中可见的 DI 的公共提供者
publicProviders: {[tokenKey: string]: NodeDef}|null;
// 与 visiblePublicProviders 相同,但还包括位于此元素上的私有提供者
allProviders: {[tokenKey: string]: NodeDef}|null;
}

默认情况下ElementInjector为空,除非在@Directive()@Component()providers属性中进行配置。

当 Angular 为嵌套的 HTML 元素创建元素注入器时,要么从父元素注入器继承它,要么直接将父元素注入器分配给子节点定义。

如果子 HTML 元素上的元素注入器具有提供者,则应该继承该注入器。否则,无需为子组件创建单独的注入器,并且如果需要,可以直接从父级的注入器中解决依赖项。

元素注入器与模块注入器的设计

那么,元素注入器与模块注入器是从哪个地方开始成为平行树的呢?

我们已经知道,应用程序根模块(AppModule)会在使用 CLI 的new命令创建新应用时,自动包含在根AppModule中。

当应用程序(ApplicationRef)启动(bootstrap)时,会创建entryComponent

1
const compRef = componentFactory.create(Injector.NULL, [], selectorOrNode, ngModule);

该过程会使用根数据(RootData)创建根视图(RootView),同时会创建根元素注入器,在这里elInjectorInjector.NULL

在这里,Angular 的注入器树被分成元素注入器树和模块注入器树,这两个平行的树了。

Angular 会有规律的创建下级注入器,每当 Angular 创建一个在@Component()中指定了providers的组件实例时,它也会为该实例创建一个新的子注入器。类似的,当在运行期间加载一个新的NgModule时,Angular 也可以为它创建一个拥有自己的提供者的注入器。

子模块和组件注入器彼此独立,并且会为所提供的服务分别创建自己的实例。当 Angular 销毁NgModule或组件实例时,也会销毁这些注入器以及注入器中的那些服务实例。

Angular 解析依赖过程

上面我们介绍了 Angular 中的两种注入器树:模块注入器树和元素注入器树。那么,Angular 在提供依赖时,又会以怎样的方式去进行解析呢。

在 Angular 种,当为组件/指令解析 token 获取依赖时,Angular 分为两个阶段来解析它:

  • 针对ElementInjector层次结构(其父级)
  • 针对ModuleInjector层次结构(其父级)

其过程如下(参考多级注入器-解析规则):

  1. 当组件声明依赖项时,Angular 会尝试使用它自己的ElementInjector来满足该依赖。
  2. 如果组件的注入器缺少提供者,它将把请求传给其父组件的ElementInjector
  3. 这些请求将继续转发,直到 Angular 找到可以处理该请求的注入器或用完祖先ElementInjector
  4. 如果 Angular 在任何ElementInjector中都找不到提供者,它将返回到发起请求的元素,并在ModuleInjector层次结构中进行查找。
  5. 如果 Angular 仍然找不到提供者,它将引发错误。

为此,Angular 引入一种特殊的合并注入器。

合并注入器(Merge Injector)

合并注入器本身没有任何值,它只是视图和元素定义的组合。

1
2
3
4
5
6
7
8
9
10
class Injector_ implements Injector {
constructor(private view: ViewData, private elDef: NodeDef|null) {}
get(token: any, notFoundValue: any = Injector.THROW_IF_NOT_FOUND): any {
const allowPrivateServices =
this.elDef ? (this.elDef.flags & NodeFlags.ComponentView) !== 0 : false;
return Services.resolveDep(
this.view, this.elDef, allowPrivateServices,
{flags: DepFlags.None, token, tokenKey: tokenKey(token)}, notFoundValue);
}
}

当 Angular 解析依赖项时,合并注入器则是元素注入器树和模块注入器树之间的桥梁。当 Angular 尝试解析组件或指令中的某些依赖关系时,会使用合并注入器来遍历元素注入器树,然后,如果找不到依赖关系,则切换到模块注入器树以解决依赖关系。

1
2
3
4
5
6
7
8
9
10
11
12
13
14
class ViewContainerRef_ implements ViewContainerData {
...
// 父级试图元素注入器的查询
get parentInjector(): Injector {
let view = this._view;
let elDef = this._elDef.parent;
while (!elDef && view) {
elDef = viewParentEl(view);
view = view.parent!;
}

return view ? new Injector_(view, elDef) : new Injector_(this._view, null);
}
}

解析过程

注入器是可继承的,这意味着如果指定的注入器无法解析某个依赖,它就会请求父注入器来解析它。具体的解析算法在resolveDep()方法中实现:

1
2
3
4
5
6
7
8
9
10
11
12
13
14
15
export function resolveDep(
view: ViewData, elDef: NodeDef, allowPrivateServices: boolean, depDef: DepDef,
notFoundValue: any = Injector.THROW_IF_NOT_FOUND): any {
//
// mod1
// /
// el1 mod2
// \ /
// el2
//
// 请求 el2.injector.get(token)时,按以下顺序检查并返回找到的第一个值:
// - el2.injector.get(token, default)
// - el1.injector.get(token, NOT_FOUND_CHECK_ONLY_ELEMENT_INJECTOR) -> do not check the module
// - mod2.injector.get(token, default)
}

如果是<child></child>这样模板的根AppComponent组件,那么在 Angular 中将具有三个视图:

1
2
3
4
5
6
<!-- HostView_AppComponent -->
<my-app></my-app>
<!-- View_AppComponent -->
<child></child>
<!-- View_ChildComponent -->
some content

依赖解析过程,解析算法会基于视图层次结构,如图所示进行:

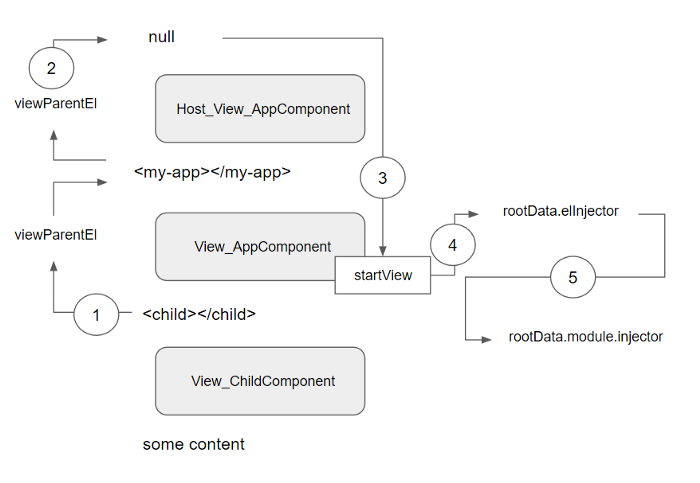
如果在子组件中解析某些令牌,Angular 将:

  1. 首先查看子元素注入器,进行检查elRef.element.allProviders|publicProviders
  2. 然后遍历所有父视图元素(1),并检查元素注入器中的提供者。
  3. 如果下一个父视图元素等于null(2),则返回到startView(3),检查startView.rootData.elnjector(4)。
  4. 只有在找不到令牌的情况下,才检查startView.rootData module.injector( 5 )。

由此可见,Angular 在遍历组件以解析某些依赖性时,将搜索特定视图的父元素而不是特定元素的父元素。视图的父元素可以通过以下方法获得:

1
2
3
4
5
6
7
8
9
10
// 对于组件视图,这是宿主元素
// 对于嵌入式视图,这是包含视图容器的父节点的索引
export function viewParentEl(view: ViewData): NodeDef|null {
const parentView = view.parent;
if (parentView) {
return view.parentNodeDef !.parent;
} else {
return null;
}
}

总结

本文主要介绍了 Angular 中注入器的层级结构,在 Angular 中有两棵平行的注入器树:模块注入器树和元素注入器树。

元素注入器树的引入,主要是为了解决依赖注入解析懒加载模块时,导致模块的双倍实例化问题。在元素注入器树引入后,Angular 解析依赖的过程也有调整,优先寻找元素注入器以及父视图元素注入器等注入器的依赖,只有元素注入器中无法找到令牌时,才会查询模块注入器中的依赖。

参考

码生艰难,写文不易,给我家猪囤点猫粮了喵~

B站: 被删

查看Github有更多内容噢:https://github.com/godbasin
更欢迎来被删的前端游乐场边撸猫边学前端噢

如果你想要关注日常生活中的我,欢迎关注“牧羊的猪”公众号噢

作者:被删

出处:https://godbasin.github.io

本文版权归作者所有,欢迎转载,但未经作者同意必须保留此段声明,且在文章页面明显位置给出原文连接,否则保留追究法律责任的权利。

文章目录
  1. 1. 多级依赖注入
    1. 1.1. 模块注入器
      1. 1.1.1. 平台模块(PlatformModule)注入器
      2. 1.1.2. 应用程序根模块(AppModule)注入器
      3. 1.1.3. 模块注入器层级
    2. 1.2. 元素注入器
      1. 1.2.1. 元素注入器的引入
      2. 1.2.2. 元素注入器(Element Injector)
      3. 1.2.3. 元素注入器与模块注入器的设计
    3. 1.3. Angular 解析依赖过程
      1. 1.3.1. 合并注入器(Merge Injector)
      2. 1.3.2. 解析过程
    4. 1.4. 总结
      1. 1.4.1. 参考