
React-Redux使用笔记7--嵌套路由的使用
更新日期:
最近又重新拾起了React框架,并配合开源模板gentelella以及Redux建立了个简单的项目。《React-Redux使用笔记》系列用于记录过程中的一些使用和解决方法。
本文记录react-router中嵌套路由的使用过程。
React Router
React Router是一个基于React之上的强大路由库,它可以让你向应用中快速地添加视图和数据流,同时保持页面与URL间的同步。
前面我们也简单使用过路由的一些功能,像跳转、Link组件等等,这节我们再稍微详细地介绍一下。
主要参考React Router中文文档。
Histories
React Router是建立在history之上的。
简而言之,一个history知道如何去监听浏览器地址栏的变化,并解析这个URL转化为location对象,然后router使用它匹配到路由,最后正确地渲染对应的组件。
常用的history有三种形式:
- browserHistory:使用浏览器中的History API用于处理像example.com/some/path这样真实的路由
- hashHistory:使用URL中的hash(#)部分去创建形如example.com/#/some/path的路由
- createMemoryHistory:Memory history不会在地址栏被操作或读取
引入
1 | import { browserHistory, hashHistory, createMemoryHistory } from 'react-router' |
- 使用
1 | // 传递给<Router> |
嵌套路由
这里我们直接结合项目来进行说明吧。
- 在AppContainer中
1 | // AppContainer.jsx |
可以看到,我们在/home路由下的子路由,均从HomeContainer作为入口。
若我们需要在HomeContainer中获得这些组件,则可以使用{ this.props.children }来获得:
1 | // HomeContainer.jsx |
常用组件API
<Router>React Router 的重要组件。它能保持 UI 和 URL 的同步。
<Link>允许用户浏览应用的主要方式。
<Link>以适当的href去渲染一个可访问的锚标签。<Link>可以知道哪个route的链接是激活状态的,并可以自动为该链接添加activeClassName或activeStyle。常用组件配置
<Route>:用于声明路由映射到应用程序的组件层<Redirect>:在应用中可以设置重定向到其他route而不改变旧的URL<IndexRoute>:当用户在父route的URL时,Index Routes允许你为父route提供一个默认的”child”, 并且为使<IndexLink>能用提供了约定<IndexRedirect>:允许你从一个父route的URL重定向到其他route。它们被用于允许子route作为父route的默认route,同时保持着不同的URL
当route匹配到URL时会渲染一个route的组件。路由会在渲染时将以下属性注入组件中:
- history:Router的history history
- location:当前的location
- params:URL的动态段
- route:渲染组件的route
- routeParams:this.props.params是直接在组件中指定route的一个子集
- children:匹配到子route的元素将被渲染
匹配路由模块展示
这里我们为了展示路由的使用,创建了各个路由匹配的模块,位于routes/home/modules下的模块组件。
创建简易的Table组件
这里本骚年为了方便展示不同路由页面模块,创建了个简单的Table组件,传入title和number自动生成n×n的表单。
我们在routes/home/components文件夹下新建Table.jsx文件:1
2
3
4
5
6
7
8
9
10
11
12
13
14
15
16
17
18
19
20
21
22
23
24
25
26
27
28
29
30
31
32
33
34
35
36
37
38
39
40
41
42
43
44
45
46
47// Table.jsx
import React, { Component, PropTypes } from 'react'
export class Table extends Component {
render() {
const { title, number } = this.props
const tEles = () => {
// theader
const hRows = [];
// tbody
const bRows = [];
// tbody > tr
let bdRows = [];
for (let i = 0; i < number; i++) {
hRows.push(<th key={i}>{"表格头部"}</th>);
bdRows = [];
for (let j = 0; j < number; j++) {
bdRows.push(<td key={j}>{"表格内容"}</td>);
}
bRows.push(<tr key={i}>{bdRows}</tr>);
}
return (
<table className="table">
<thead><tr>{hRows}</tr></thead>
<tbody>{bRows}</tbody>
</table>
)
}
return (
<div>
<div className="col-md-6 col-sm-6 col-xs-12">
<div className="x_panel">
<div className="x_title">
<h2>{title} <small></small></h2>
<div className="clearfix"></div>
</div>
<div className="x_content">
{tEles()}
</div>
</div>
</div>
</div>
)
}
}
export default Table
添加各个模块组件
在每个模块组件中我们简单使用Table组件进行区分,如:1
2
3
4
5
6
7
8
9
10
11
12
13
14
15// BasicService.jsx
import React, { Component, PropTypes } from 'react'
import Table from '../../components/Table.jsx'
export class BasicService extends Component {
render() {
return (
<div>
<Table title={'基础服务配置'} number={5} />
</div>
)
}
}
export default BasicService
文件结构
现在我们的文件结构如图: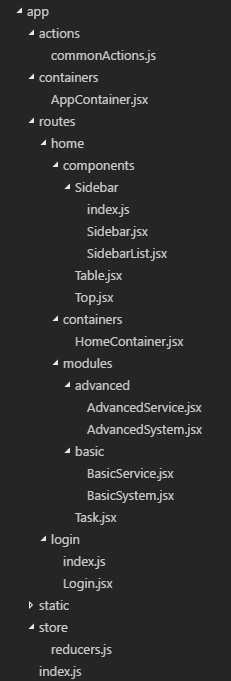
虽然乍一看很复杂,但是其实逻辑很简单:
- 最外层
- actions:存放action
- containers: 存放应用外壳
- routes:存放应用内容,根据路由的层级匹配来存放
- components:存放结构类组件
- containers:存放外壳类组件
- modules:存放模块展示类组件(匹配路由)
- static:存放静态资源
- store:存放reducer
- index.js:入口文件
至此,我们大致完成了路由的嵌套匹配展示。
效果如图: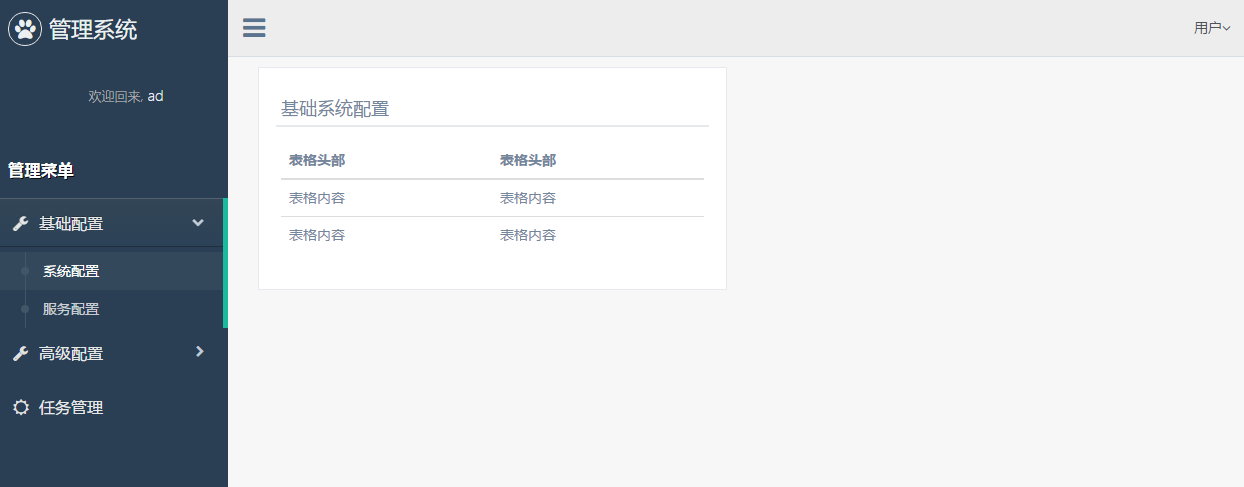
结束语
嵌套的路由,能将整个应用的结构变得更加清晰简洁。并且在开发过程中,我们的业务、路由、组件三者的逻辑紧密相关,也很易于维护和开发呢。
此处查看项目代码
此处查看页面效果

码生艰难,写文不易,给我家猪囤点猫粮了喵~
查看Github有更多内容噢:https://github.com/godbasin
更欢迎来被删的前端游乐场边撸猫边学前端噢
如果你想要关注日常生活中的我,欢迎关注“牧羊的猪”公众号噢