
React-Redux使用笔记4--使用Redux管理状态
更新日期:
最近又重新拾起了React框架,并配合开源模板gentelella以及Redux建立了个简单的项目。《React-Redux使用笔记》系列用于记录过程中的一些使用和解决方法。
本文记录使用Redux管理状态的过程。
Redux
随着JavaScript单页应用开发日趋复杂,JavaScript需要管理比任何时候都要多的state(状态)。Redux试图让state的变化变得可预测。
三大原则
- 单一数据源
整个应用的state被储存在一棵object tree中,并且这个object tree只存在于唯一一个store中。
- State 是只读的
惟一改变 state 的方法就是触发 action,action 是一个用于描述已发生事件的普通对象。
- 使用纯函数来执行修改
为了描述action如何改变state tree,你需要编写reducers。
Reducer只是一些纯函数,它接收先前的state和action,并返回新的state。
Action
- Action
Action是把数据从应用传到store的有效载荷。
它是store数据的唯一来源。一般来说你会通过store.dispatch()将action传到store。
Action本质上是JavaScript普通对象。我们约定,action内必须使用一个字符串类型的type字段来表示将要执行的动作。
我们应该尽量减少在action中传递的数据。
- Action创建函数
Action创建函数就是生成action的方法。
Reducer
Reducer指明应用如何更新state。
reducer就是一个纯函数,接收旧的state和action,返回新的state。
永远不要在reducer里做这些操作:
- 修改传入参数
- 执行有副作用的操作,如API请求和路由跳转
- 调用非纯函数,如
Date.now()或Math.random()
注意:
- 不要修改state
使用
Object.assign()新建了一个副本。不能这样使用Object.assign(state, { visibilityFilter: action.filter }),因为它会改变第一个参数的值。你必须把第一个参数设置为空对象
你也可以开启对ES7提案对象展开运算符的支持, 从而使用{ ...state, ...newState }达到相同的目的 - 在default情况下返回旧的state
遇到未知的action时,一定要返回旧的state
Store
Store 就是把它们联系到一起的对象。
Store 有以下职责:
- 维持应用的state
- 提供
getState()方法获取state - 提供
dispatch(action)方法更新state - 通过
subscribe(listener)注册监听器 - 通过
subscribe(listener)返回的函数注销监听器
Redux应用只有一个单一的store。当需要拆分数据处理逻辑时,你应该使用reducer组合而不是创建多个store。
数据流
严格的单向数据流是Redux架构的设计核心。
Redux应用中数据的生命周期遵循下面4个步骤:
- 调用store.dispatch(action)
- Redux store调用传入的reducer函数
- 根reducer应该把多个子reducer输出合并成一个单一的state树
- Redux store保存了根reducer返回的完整state树
Redux和Flux
- store
Redux只有一个store。Redux将各个store整合成一个完整的store,并且可以根据这个store推导出应用完整的 state。同时Redux中更新的逻辑也不在store中执行而是放在reducer中
Flux里面会有多个store存储应用数据,并在store里面执行更新逻辑,当store变化的时候再通知controller-view更新自己的数据 - 没有Dispatcher
Redux中没有Dispatcher的概念,它使用reducer来进行事件的处理,reducer是一个纯函数,这个函数被表述为
(previousState, action) => newState,它根据应用的状态和当前的action推导出新的state
参考
React与Redux
这次我们使用Redux来管理应用的状态。
安装React Redux
1 | npm install --save react-redux |
改造项目结构
上了Redux后本骚年的目录结构如图: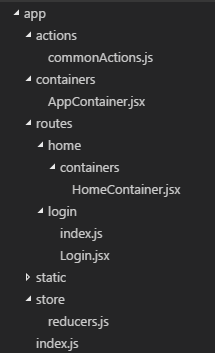
可以看到,这里除了增加了Redux相关的actions、store相关文件,也将原有目录组织重新调整了一下。
- containers/AppContainer.jsx为整个应用外壳
- routes会根据应用路由管理
- containers为该路由主外壳
- modules为该路由的一些模块
- components为该路由的一些组件
创建actions
在actions文件夹下新建commonActions.js文件:1
2
3
4
5
6
7// action 类型
export const USER_NAME = 'USER_NAME'
// action 创建函数
export function setUserName(state) {
return { type: USER_NAME, state }
}
这里我们创建了一个设置用户名的action创建函数,其action的type是USER_NAME。
创建reducers
在store文件夹下新建reducers.js文件:1
2
3
4
5
6
7
8
9
10
11
12
13
14
15
16
17
18
19import { combineReducers } from 'redux'
import { USER_NAME } from '../actions/commonActions'
// userName的reducer用于改变userName的状态
function userName(state = null, action) {
switch (action.type) {
case USER_NAME:
return action.state
default:
return state
}
}
// 合并多个reducers
const AppReducer = combineReducers({
userName
})
export default AppReducer
更新index.js入口文件
入口文件index.js如下:1
2
3
4
5
6
7
8
9
10
11
12
13
14
15
16import React from 'react'
import ReactDOM from 'react-dom'
import { createStore } from 'redux'
import { Provider } from 'react-redux'
import AppContainer from './containers/AppContainer.jsx'
import AppReducer from './store/reducers'
const store = createStore(AppReducer)
const MOUNT_NODE = document.getElementById('root')
ReactDOM.render(
<Provider store = { store } >
<AppContainer />
</Provider>,
MOUNT_NODE
)
其中,<Provider store>使组件层级中的connect()方法都能够获得Redux store。正常情况下,你的根组件应该嵌套在<Provider>中才能使用connect()方法。
使用AppContainer作为APP外壳
在containers文件夹下新建AppContainer.jsx文件:1
2
3
4
5
6
7
8
9
10
11
12
13
14
15
16
17
18
19
20
21
22
23
24
25import React, { Component, PropTypes } from 'react' //react
import { Router, Route, Link, hashHistory, IndexRedirect, useRouterHistory } from 'react-router'
import { createHistory, createHashHistory } from 'history'
import { createStore } from 'redux'
import Login from '../routes/login'
import HomeContainer from '../routes/home/containers/HomeContainer.jsx'
let history = useRouterHistory(createHashHistory)()
export class AppContainer extends Component {
render() {
// 正常的react-router使用方式
return (
<Router history={history} >
<Route path="/">
<IndexRedirect to={"login"} />
<Route path="login" component={Login} />
<Route path="home" component={HomeContainer} />
</Route>
</Router>
)
}
}
export default AppContainer
Login组件添加action处理
Login组件如下:1
2
3
4
5
6
7
8
9
10
11
12
13
14
15
16
17
18
19
20
21
22
23
24
25
26
27
28
29
30
31
32
33
34
35
36
37
38
39
40
41
42
43
44
45
46
47
48
49
50
51
52
53
54
55
56
57
58
59
60
61import React, { Component, PropTypes } from 'react'
import { connect } from 'react-redux'
import { setUserName } from '../../actions/commonActions.js'
export class Login extends Component {
render() {
return (
<div>
<a className="hiddenanchor" id="signup"></a>
<a className="hiddenanchor" id="signin"></a>
<div className="login_wrapper">
<div className="animate form login_form">
<section className="login_content">
<form onKeyPress={(e) => { if (e.key === 'Enter') { this.loginSubmit(e) } } }>
<h1>管理系统</h1>
<div>
<input type="text" className="form-control" placeholder="用户名" ref="username" required />
</div>
<div>
<input type="password" className="form-control" placeholder="密码" ref="password" required />
</div>
<div>
<a className="btn btn-default submit" onClick={(e) => { this.loginSubmit(e) } }>登录</a>
</div>
<div className="clearfix"></div>
</form>
</section>
</div>
</div>
</div>
)
}
loginSubmit() {
const username = this.refs.username.value.trim()
const password = this.refs.password.value.trim()
// console.log(JSON.stringify({username,password}).toString());
if (username === undefined || password === undefined) {
Notify({
title: '账户或密码不能为空',
type: 'error'
})
return
}
// dispatch setUserName的action,触发更新userName状态
this.props.dispatch(setUserName(username))
this.context.router.push('/home')
}
componentDidMount() {
$('body').attr('class', 'login')
}
}
Login.contextTypes = {
router: React.PropTypes.object
}
// 使用connect,只注入dispatch,不监听store
export default connect()(Login)
connect([mapStateToProps], [mapDispatchToProps], [mergeProps], [options])- 连接React组件与Redux store
- 连接操作不会改变原来的组件类。反而返回一个新的已与Redux store连接的组件类
HomeContainer处理是否登陆
在routes/home/containers文件夹下新建HomeContainer.jsx文件:1
2
3
4
5
6
7
8
9
10
11
12
13
14
15
16
17
18
19
20
21
22
23
24
25
26
27
28
29
30
31
32
33
34
35
36
37
38
39
40
41
42
43
44
45
46
47
48
49
50
51import React, { Component, PropTypes } from 'react'
import { connect } from 'react-redux'
export class HomeContainer extends Component {
render() {
const that = this
return (
<div className="container body">
<div className="main_container">
<div className="right_col" role="main">
Hello World!
</div>
<footer>
<div className="pull-right">
@godbasin
</div>
<div className="clearfix"></div>
</footer>
</div>
</div>
)
}
componentDidMount() {
// 判断如果未登陆则跳转
if (this.props.getUserName() === null) {
Notify({
title: '请先登录',
type: 'error'
})
this.context.router.push('/login')
}
$('body').attr('class', 'nav-md')
$('.right_col').css('min-height', $(window).height())
}
}
HomeContainer.contextTypes = {
router: React.PropTypes.object
}
function connectState(state) {
return {
getUserName() {
return state.userName
}
}
}
// 使用connect,注入dispatch和userName
export default connect(connectState)(HomeContainer)
至此,我们大概完成了Redux的状态管理,并在登录中使用。
结束语
其实,Redux和React之间没有关系。Redux 支持 React、Angular、Ember、jQuery甚至纯JavaScript,不过这两者搭配的效果也很棒棒的。关于Redux还有更多需要研究的,小伙伴们下来也可以多多琢磨呢。
此处查看项目代码
此处查看页面效果

码生艰难,写文不易,给我家猪囤点猫粮了喵~
查看Github有更多内容噢:https://github.com/godbasin
更欢迎来被删的前端游乐场边撸猫边学前端噢
如果你想要关注日常生活中的我,欢迎关注“牧羊的猪”公众号噢